Importing, Exporting and Seating Guests
Either you or your guest can import a custom list of attendees for any scene - including such information as meal choice, group, allergies, email, phone and RSVP status. Attendees can then be dragged and dropped to any seat at any table in the layout, and any attendee information can be optionally included on your layout print or exported to excel.
- In a scene layout, click/tap the Attendees sidebar option
 .
.
Result: The Assign Guests panel opens on the right-hand side of your screen.
- Click/tap the Edit Attendees button, located on the lower right-hand side of your screen, in the Assign Guests panel.
Result: The Import Attendee List window opens.
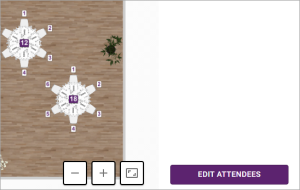
- Click/tap the Upload File button.
Result: A browse window opens, where you can search for and select your stored CSV file.
Note: To view a sample CSV file, click the TEMPLATE button on the Import Attendee List window or click here.
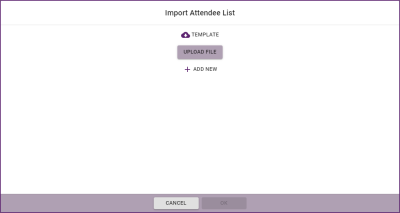
- Select the desired import file and click/tap Open.
Result: The window populates with the guest names and details from your import list.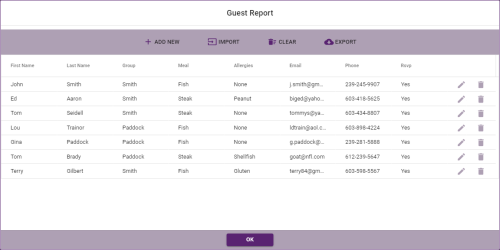
- [Optional] Edit the details of any guest on the list by clicking/tapping the corresponding Edit button
 to the right of that guest's information.
 - [Optional] Delete any guest from the list by clicking/tapping the corresponding Delete button
 to the right of that guest's information.
Note: Click/tap the Clear button at the top of the modal to remove all information from the list here in Placez (but not from your original import file). - [Optional] Click the Add New button
 at the top of the guest list modal to add a new guest to the list.
 - Once you are satisfied with your attendee details, click/tap the OK button to accept the list.
Result: The names and initials of your attendees appear in the Assign Guests panel at the right side of your screen.
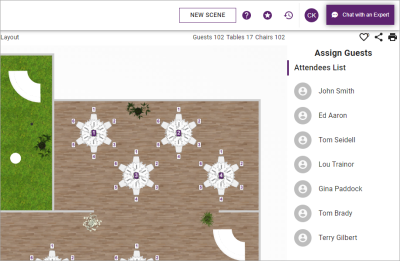
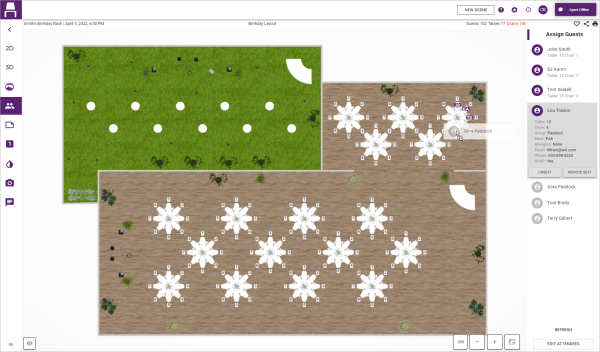
- After importing/creating a list of attendees (see section above), click/tap a name from the Assign Guests panel, and drag and drop into a position at any desired table.
Note: Seat numbers begin in the top center position on round tables (slightly right of center for tables with no seat at top center) and top left for rectangular tables. Table numbers can be assigned by you (see Assigning Table Numbers to a Layout). Optionally show seat or table numbers on screen by clicking/tapping the View button at the bottom left of your layout and the clicking/tapping the Chair Number button
  or Table Number button
  .
.
- Repeat Step 1, above, until all attendees from the Attendees List have been placed at the desired seating arrangements.
- [Optional] In the Assign Guests panel along the right side of the screen, select any guest who has already been assigned a seat and click the corresponding Unseat button to unseat the guest or the Remove Seat button to unseat the guest and remove his/her chair from the table.
- When finished, exit the layout or use the sidebar on the left side of the program to move on to a different view.
Note: Guest seating will automatically save any changes so you do not need to constantly switch in and out of edit mode to rearrange guests.
- Follow Steps 1 through 3 from the topic above, "Importing an Attendee List."
- Click/tap the Import button to re-import your revised CSV file.
- Click/tap the OK button.
Result: The import will reflect the additions, edits, and deletions of your revised CSV file.

- In a scene layout, click/tap the Attendees sidebar option
 .
.
Result: The Assign Guests panel opens on the right-hand side of your screen.
- Click/tap the Edit Attendees button, located at the bottom of the Assign Guests panel along the right side of your screen.
Result: The Guest Report window opens.
Note: If you have not yet imported a list of attendees, please see that section above.
- Click the Export button at the top of the Guest Report window.
Result: The existing attendee list is exported and available in your Downloads folder.
See Also: